
 中文简体
中文简体 Español
 عربى
عربىHow to Clean Lip Gloss Tube: Complete Guide
Industry News-Content
- 1 The Short Answer: How to Clean a Lip Gloss Tube
- 2 Why People Clean Lip Gloss Tubes
- 3 What You Need Before You Start
- 4 Step-by-Step: How to Clean a Standard Lip Gloss Tube
- 5 How to Clean Lip Gloss Tubes with Pump or Airless Dispensers
- 6 Cleaning the Wand Applicator: Do Not Overlook This
- 7 Common Mistakes That Ruin the Cleaning Process
- 8 How Cosmetic Airless Bottles Compare to Standard Tubes for Hygiene
- 9 How to Know If a Lip Gloss Tube Is Worth Cleaning
- 10 After Cleaning: Tips for Keeping Lip Gloss Tubes Cleaner for Longer
- 11 Choosing the Right Empty Tubes for DIY Lip Gloss
The Short Answer: How to Clean a Lip Gloss Tube
Cleaning a lip gloss tube is straightforward once you know the right method. Empty the tube completely, rinse it with warm water and mild dish soap, use a thin brush or cotton swab to scrub the interior, rinse again, and allow it to air dry upside down for at least 24 hours. Whether you are salvaging a nearly empty tube to refill it, sanitizing a vintage find, or recycling packaging, this process works for the vast majority of standard lip gloss tubes on the market.
That said, not all lip gloss packaging is created equal. Some tubes are narrow and nearly impossible to clean thoroughly. Others — particularly the cosmetic airless bottle style — are designed with dispensing mechanisms that complicate the cleaning process. Understanding your tube type before you start saves time and avoids damaging the packaging.
Why People Clean Lip Gloss Tubes
Before getting into the step-by-step process, it helps to understand the most common reasons people clean these tubes. The reason matters because it shapes how thorough you need to be.
- Refilling with a new formula: DIY beauty enthusiasts frequently purchase empty or used lip gloss tubes and fill them with homemade glosses made from shea butter, vitamin E oil, and cosmetic pigments. Any residue left from the original product can contaminate the new formula, alter the color, or introduce bacteria.
- Hygiene after illness: Lip products are notorious for harboring bacteria and viruses. If you used a lip gloss while sick, cleaning and sanitizing the tube before reuse is important for your own health.
- Sharing between people: Sharing lip gloss is common in households or among friends. Proper cleaning between users reduces the risk of transmitting oral herpes (HSV-1) and other infections.
- Recycling and upcycling: Cosmetic packaging generates significant waste. Many people clean tubes for craft projects, storage of small items, or to return them to cosmetic recycling programs such as TerraCycle or MAC's Back-to-MAC initiative.
- Removing old, expired product: Lip gloss typically has a shelf life of 12 to 24 months after opening. Cleaning out an expired product ensures you are not accidentally using a contaminated tube later.
What You Need Before You Start
Gathering your supplies before starting makes the process much smoother. Most of what you need is probably already in your home.
- Warm water (not boiling, as extreme heat can warp plastic packaging)
- Mild dish soap or baby shampoo
- Isopropyl alcohol (70% or 91% concentration) for disinfecting
- Cotton swabs (Q-tips) and small bottle brushes
- Paper towels or clean lint-free cloths
- Coconut oil or petroleum jelly (for loosening stubborn gloss residue)
- A toothpick or skewer (for reaching narrow applicator tips)
- A small funnel (optional, helpful for refilling after cleaning)
For tubes with pump dispensers — including those modeled after the cosmetic airless bottle design — you may also need a thin straw or pipette to flush the pump mechanism.
Step-by-Step: How to Clean a Standard Lip Gloss Tube
Follow these steps carefully. Rushing any stage — especially the drying phase — is the most common mistake that leads to mold growth or product contamination.
Step 1: Remove as Much Product as Possible
Use the wand applicator or a clean spatula to scrape out every bit of gloss you can. If the gloss has thickened or become stiff due to age, warm the tube gently by placing it in a bowl of warm (not hot) water for two to three minutes. This softens the formula and makes it much easier to remove. Never use a microwave to warm a lip gloss tube — the plastic or metal components can warp, and some formulas contain ingredients that can release harmful compounds when overheated.
Step 2: Apply an Oil-Based Pre-Cleaner
Lip gloss formulas are oil-based, which means water alone will not dissolve the residue effectively. Apply a small amount of coconut oil, mineral oil, or petroleum jelly to a cotton swab and wipe the inside of the tube thoroughly. This step breaks down the waxy, oily residue that clings to the walls of the container. Work the cotton swab around the entire interior, paying special attention to the neck of the tube where the wand sits — this area tends to accumulate the most buildup.
Step 3: Wash with Warm Soapy Water
Add two or three drops of mild dish soap to warm water. Submerge the tube (with the cap removed) and use a small bottle brush or folded pipe cleaner to scrub the interior. If the tube opening is too narrow for a brush, fill the tube halfway with soapy water, place your thumb firmly over the opening, and shake vigorously for 30 seconds. Pour out the water and repeat at least twice. For the wand and cap, wash them separately in the same soapy water.
Step 4: Rinse Thoroughly
Soap residue left inside the tube will contaminate any new product you put in, and it can cause skin irritation if you apply it to your lips. Rinse with clean warm water at least three times. Hold the tube up to a light source after rinsing — if you see any milky or sudsy residue, rinse again.
Step 5: Disinfect with Isopropyl Alcohol
This step is especially important if you are cleaning a tube for hygiene reasons or before sharing. Dampen a fresh cotton swab with 70% or 91% isopropyl alcohol and wipe the inside of the tube, the wand, and the cap. You can also fill the tube with alcohol, let it sit for 60 seconds, then pour it out. Alcohol at 70% concentration is actually more effective at killing bacteria than 91% because the water content helps it penetrate cell membranes — a fact many people find counterintuitive.
Step 6: Dry Completely Before Reuse or Refilling
Place the tube upside down on a clean paper towel to allow water to drain out completely. Leave it in a well-ventilated area for a minimum of 24 hours — 48 hours is better, especially in humid climates. Any moisture remaining in the tube creates an ideal environment for mold and bacteria to grow. If you are in a hurry, you can use a hair dryer on the lowest heat setting to speed up drying, but keep it at least 15 cm away from the plastic to avoid warping.
How to Clean Lip Gloss Tubes with Pump or Airless Dispensers
Pump-style and airless dispenser lip gloss tubes require a different approach. The cosmetic airless bottle design — which uses a vacuum pump mechanism rather than a traditional squeeze tube — has become increasingly popular in premium lip care because it protects formulas from oxidation and contamination. However, the internal piston and pump mechanism make cleaning significantly more complex.
Understanding the Airless Bottle Mechanism
A cosmetic airless bottle works by using a disc or piston at the bottom of the container that pushes the product upward toward the pump as it is dispensed. Because no air enters the bottle, the formula stays fresher for longer — a key advantage for natural and preservative-free lip glosses. The airless pump system is also used in skincare serums, foundations, and eye creams for the same reason.
The downside for cleaning purposes is that you cannot simply open the top and scrub the inside. The piston mechanism means the container is essentially sealed from below. Some airless bottle designs allow you to remove the bottom plate by pressing a pin into a small hole on the base, which releases the piston and allows full access to the interior.
Cleaning Steps for Airless Pump Lip Gloss Tubes
- Pump out all remaining product until the pump stops dispensing.
- Locate the small pin hole on the base of the bottle (present on most airless bottle designs). Insert a thin pin or paperclip and press gently to release the bottom plate.
- Remove the piston disc from inside the bottle and clean it separately with soapy water.
- Flush the pump mechanism by filling a small bowl with warm soapy water, placing the pump tube into the water, and pumping repeatedly until the water runs clear from the nozzle.
- Rinse the pump mechanism using the same method with plain water.
- Flush once more with isopropyl alcohol.
- Reassemble and allow all components to dry for 48 hours before refilling.
Not all airless dispenser bottles can be disassembled. If yours does not have a removable base, the most effective cleaning method is to flush the pump repeatedly with warm soapy water, then with isopropyl alcohol, then with plain water. While this does not clean the interior walls thoroughly, it sanitizes the pump mechanism — the highest-contact area.
Cleaning the Wand Applicator: Do Not Overlook This
The wand applicator is the component that comes into direct contact with your lips, making it the most important part to clean thoroughly. Many people focus on cleaning the tube but give the wand only a quick wipe, which is insufficient.
Wand applicators come in several styles — doe-foot applicators, brush-tip applicators, and cushion-tip applicators. Each requires slightly different handling during cleaning.
| Applicator Type | Cleaning Method | Drying Time | Notes |
|---|---|---|---|
| Doe-foot (sponge tip) | Soak in warm soapy water 10 min, squeeze, rinse | 24–48 hours | Squeeze gently — do not wring or twist |
| Brush tip (fine bristles) | Swirl in soapy water, rinse under running water | 12–24 hours | Reshape bristles before drying |
| Cushion tip | Press onto paper towel to extract product, then soapy water | 24–48 hours | Avoid saturating the base where foam attaches to wand |
| Plastic doe-foot (no sponge) | Wipe with alcohol-dampened cotton pad | 5–10 minutes | Quickest to clean and dry |
After cleaning and drying the wand, do a final wipe with a cotton pad dampened with isopropyl alcohol immediately before reinserting it into the cleaned tube. This eliminates any airborne bacteria that may have settled on the applicator during the drying period.
Common Mistakes That Ruin the Cleaning Process
Even with good intentions, certain habits can make the cleaning process ineffective or even damage the packaging. Avoid these mistakes.
Using Boiling Water
Boiling water is fine for glass containers but will warp most plastic lip gloss tubes. Water above 60°C can deform the tube, cause the cap to no longer fit correctly, and compromise any pump mechanism. Stick to warm water — around 40 to 45°C is effective for dissolving oily residue without damaging the packaging.
Skipping the Oil Pre-Treatment
Jumping straight to soap and water without first breaking down the oily residue means you will spend much more time scrubbing and still may not get the tube fully clean. Lip gloss is formulated to be water-resistant — that is what makes it stay on your lips. An oil-based pre-cleaner is not optional; it is the step that does most of the real work.
Not Drying Long Enough
This is the most damaging mistake of all. Residual moisture inside a sealed lip gloss tube creates a perfect environment for mold and bacterial growth. Mold can begin growing on damp surfaces within 24 to 48 hours under the right conditions. If you refill a tube that still has moisture inside, you are essentially sealing that moisture in with your new product — and creating a health risk.
Using Harsh Chemicals
Bleach, acetone (nail polish remover), and strong solvents are not appropriate for cleaning lip gloss tubes. These chemicals can leave residue that is harmful to apply to your lips, and they can degrade certain plastics and adhesives used in the packaging. Isopropyl alcohol is the strongest cleaning agent you should use on cosmetic packaging.
Putting the Tube in the Dishwasher
Dishwashers operate at very high temperatures — typically 60 to 75°C — which will warp most lip gloss tubes. The high-pressure water jets can also force water into pump mechanisms and damage applicator brushes or sponge tips beyond repair. Hand washing is always the correct approach for cosmetic packaging.
How Cosmetic Airless Bottles Compare to Standard Tubes for Hygiene
If you find yourself cleaning lip gloss tubes frequently — whether for hygiene, refilling, or recycling — it is worth understanding the difference in hygiene performance between standard tubes and the increasingly common cosmetic airless bottle format.
Standard lip gloss tubes expose the product to air every time you open them. The wand applicator, which contacts your lips and then returns to the tube, introduces bacteria and environmental contaminants into the product with each use. Studies on mascara tubes — which share a very similar design — have found that contamination levels rise significantly after just a few weeks of regular use.
Cosmetic airless bottles eliminate this cycle of recontamination because the product is dispensed without the wand re-entering the reservoir. The vacuum mechanism means the formula is never exposed to air inside the container, reducing oxidation and microbial growth. This is why many natural and organic lip care brands — which often use preservative-free formulas — prefer the airless bottle format.
| Factor | Standard Tube | Cosmetic Airless Bottle |
|---|---|---|
| Hygiene during use | Lower (wand reintroduces bacteria) | Higher (no wand re-entry into reservoir) |
| Ease of cleaning | Moderate (accessible interior) | More complex (pump mechanism involved) |
| Product protection from oxidation | Low | High |
| Typical shelf life after opening | 12–18 months | 18–24 months |
| Refillable potential | High | Moderate (requires disassembly) |
| Cost of packaging | Lower | Higher |
From a daily hygiene standpoint, the airless pump format wins clearly. From a cleaning-for-refill standpoint, the standard tube is easier to access and clean thoroughly. If you are sourcing empty tubes specifically for DIY refilling, standard squeeze tubes or screw-cap pots are the most practical options.
How to Know If a Lip Gloss Tube Is Worth Cleaning
Not every lip gloss tube is worth the effort of cleaning. Before you invest time in the process, inspect the tube and ask yourself a few questions.
- Is the tube structurally intact? Cracks or chips in the tube mean it cannot be sealed properly, which makes refilling pointless and hygiene impossible to maintain.
- Does the cap fit tightly? A loose cap will allow air and bacteria to enter, negating the point of cleaning.
- Is there visible mold already present? If you can see black, green, or white mold growth inside the tube, the tube is not salvageable for cosmetic use. Discard it and use the packaging only for non-beauty purposes like craft storage.
- Is the applicator damaged? If the sponge tip is torn, the bristles are frayed, or the wand is bent, the applicator should be discarded. You can still use the tube itself if it is in good condition.
- Is the pump mechanism on an airless bottle still functioning? If an airless pump is clogged and does not respond to flushing with warm water, the mechanism is likely permanently blocked. The container body may still be usable as a pot or storage vessel, but the pump function is lost.
After Cleaning: Tips for Keeping Lip Gloss Tubes Cleaner for Longer
Whether you have just cleaned a tube and refilled it or you are starting fresh with a new lip gloss, these habits will help keep your product hygienic for as long as possible.
Wipe the Wand Before Returning It to the Tube
After each application, give the wand a gentle wipe with a clean tissue before capping it. This removes lip cells and bacteria from the surface of the applicator, reducing the amount of contamination that re-enters the tube each time.
Store Horizontally, Not Upright
Storing a lip gloss tube horizontally distributes the product more evenly and prevents the formula from pooling at the base of the wand, which can cause the cap area to become sticky and accumulate residue more quickly.
Keep Away from Heat and Direct Sunlight
Heat accelerates the breakdown of cosmetic formulas and encourages bacterial growth. Storing lip gloss in a car — where temperatures can exceed 60°C on a warm day — can cause the formula to separate, change color, or develop an unpleasant odor within hours. Keep lip gloss in a cool, shaded location.
If you want to let someone try your lip gloss, dispense a small amount onto a clean spatula or single-use applicator rather than handing over the tube. This prevents cross-contamination and keeps your product hygienic for longer.
Replace Regularly and Track the PAO Symbol
Every cosmetic product has a Period After Opening (PAO) symbol — a small icon that looks like an open jar with a number inside, such as "12M" (12 months). This is the manufacturer's guidance on how long the product remains safe to use after opening. Using lip gloss beyond its PAO period increases the risk of applying an expired, contaminated product to your lips. Write the date you opened a new tube on the bottom with a permanent marker so you never lose track.
Choosing the Right Empty Tubes for DIY Lip Gloss
If your main goal is refilling rather than cleaning an existing tube, buying new empty packaging is often more practical and hygienic than re-cleaning old ones. The market for empty cosmetic packaging has grown significantly — you can easily find options wholesale or through craft supply platforms.
When choosing empty tubes for DIY lip gloss, consider the following factors:
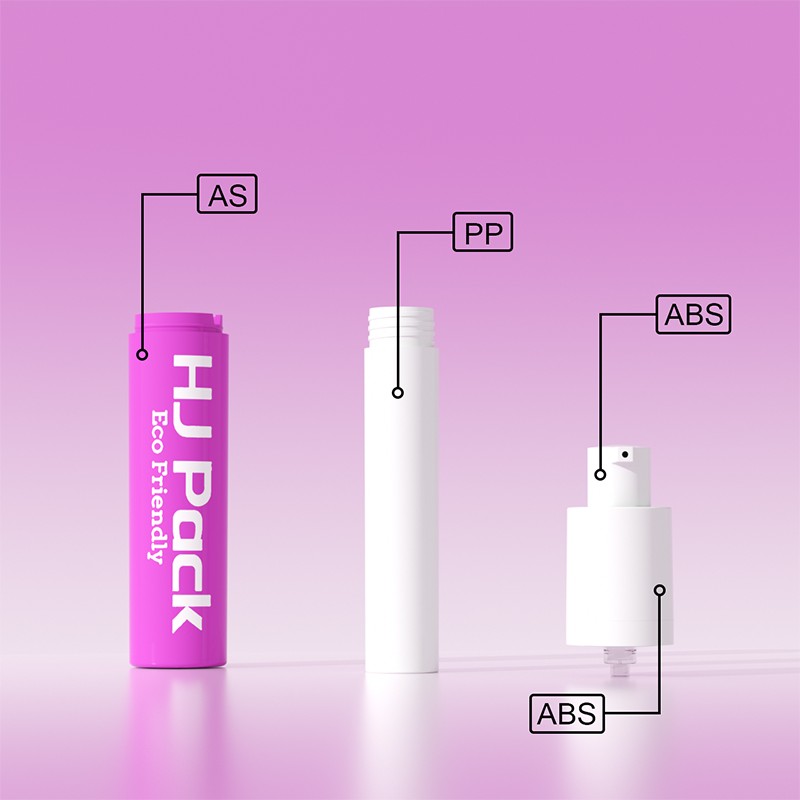
- Material: Look for tubes made from PP (polypropylene) or PET (polyethylene terephthalate) plastic, both of which are considered food-safe and cosmetic-grade. Avoid PVC packaging.
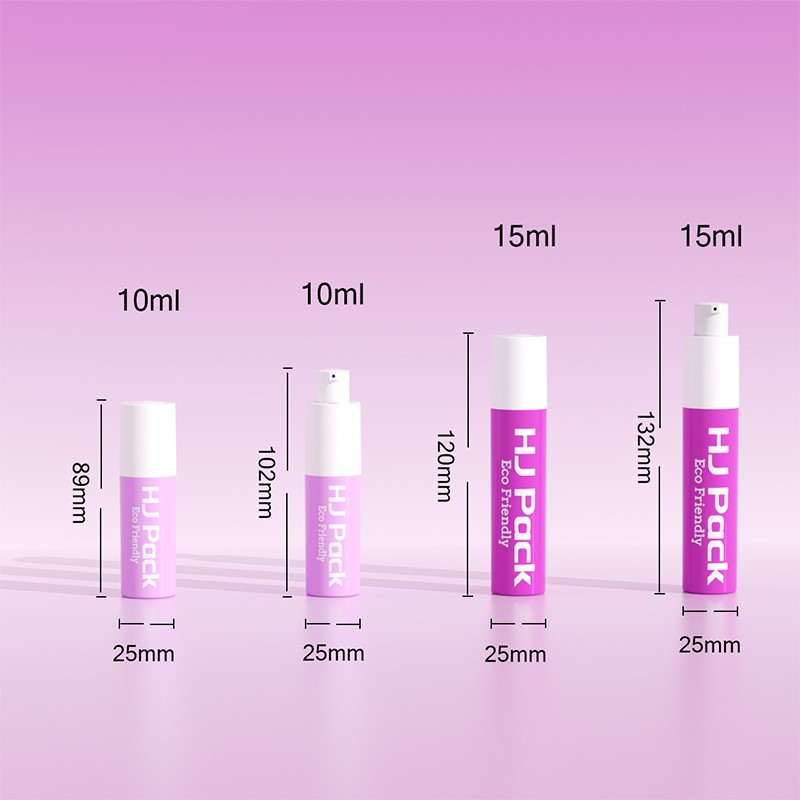
- Capacity: Standard lip gloss tubes range from 5 ml to 10 ml. For personal use, 5 ml tubes are manageable; for gifting or small-batch production, 8–10 ml tubes are more practical.
- Applicator style: For homemade glosses, doe-foot applicators are the most forgiving and easiest to work with. Brush-tip applicators work better for more precise, thicker formulas.
- Airless or standard: If your DIY formula contains no preservatives, investing in empty cosmetic airless bottles or airless pump packaging significantly extends the usable life of your product by protecting it from oxidation and contamination. Many suppliers now offer mini airless pump bottles specifically sized for lip products.
For those making larger batches, refillable airless dispenser packaging designed for cosmetics is available from suppliers such as Alibaba-listed cosmetic packaging manufacturers, SKS Bottle & Packaging, and Berlin Packaging. These containers allow multiple refills and are built to withstand repeated cleaning cycles — a meaningful consideration for sustainability-conscious makers.
Our Products //
Related Product


- E-mail: [email protected]
- Phone: +86-15962399191
- Add: No. 60-7, East Side of Jinzhong Road, Jinfeng Town, Zhangjiagang City, Suzhou City, Jiangsu Province
Copyright © Zhangjiagang Haojie Packaging Technology Co., Ltd. All Rights Reserved.
 China Cosmetic Packaging Manufacturers
China Cosmetic Packaging Manufacturers